외부로 service하는 방법
1. Port forwarding
1) 개요
- master node에서 접속할 pod를 대상으로 port forwarding을 해주는 것입니다.
- process레벨로 돌아가기 때문에 매번 설정을 해줘야 되서 테스트 할 때만 사용하는게 좋음
2) 설정 방법
- 배포 할 Pod
root@master:~/k8s_yaml# cat nginx-pod.yaml
apiVersion: v1
kind: Pod
metadata:
  name: nginx-pod
spec:
  containers:
  - name: nginx
    image: nginx:1.14.2
- 명령어
#kubectl port-forward --address 0.0.0.0 nginx-pod 80:80
2. NodePort
1) 개요
service ip를 알아야만 사용할 수 있는 외부 노출 방법
2) 유의 사항
- IP:port를 통해서만 접속이 가능 합니다.
- 외부로 서비스 노출 시 30000-32767 사이 port 밖에 할당을 못합니다.
3) 설정 방법
(1) 핵심
- nodeport type으로 하는 service를 생성하여 배포된 pod와 연결을 시켜 주면됩니다.
(2) Yaml 파일
apiVersion: apps/v1
kind: Deployment
metadata:
  name: nginx-deployment
  labels:
    app: jk-nginx
spec:
  replicas: 2
  selector: # Deployment를 이용해 배포할 Pod로 만들 template을 선택 합니다.
    matchLabels:
      app: pod-nginx
  template:
    metadata: # template로 만들 pod를 정의하는것과 동일
      labels:
        app: pod-nginx
    spec:
      containers: #container들을 정의 합니다.
      - name: container-nginx
        image: nginx:1.14.2
        ports:
        - containerPort: 80
---
apiVersion: v1
kind: Service
metadata:
  name: my-nginx-service
  labels:
    run: my-nginx-service
spec:
  type: NodePort     # 서비스 타입
  selector:
    app: pod-nginx
  ports:
  - nodePort: 30000  # host에서 외부에 노출할 port
    port: 80         # host에서 open된 port
    targetPort: 80   # pod에서 open된 port
    protocol: TCP
    name: http
(3) Yaml 파일 설명

2. Loadbalancer
1) 개요
k8s에서는 기본적으로 loadbalancer를 제공하지 않고 있습니다. 그래서 plug-in을 따로 설치 해야 합니다.
CNCF에서 제일 유명한 것이 metal lb 입니다.
2) 사용 이유
외부에 직접 다른 service port를 노출 시킬수 있음
3) 설치 순서
아래 링크에 나온 순서대로 설치 합니다.
https://metallb.universe.tf/installation/
(1) 사전 설정
kubectl edit configmap -n kube-system kube-proxy
and set:
apiVersion: kubeproxy.config.k8s.io/v1alpha1
kind: KubeProxyConfiguration
mode: "ipvs"
ipvs:
  strictARP: true
(2) manifest 를 사용한 설치
kubectl apply -f https://raw.githubusercontent.com/metallb/metallb/v0.13.7/config/manifests/metallb-native.yaml
(3) IP 네트워크 대역 설정
- 설치 파일에 파일에 설정이 안들어있기 때문에 External IP 대역폭을 설정해줘야합니다.
The installation manifest does not include a configuration file. MetalLB’s components will still start, but will remain idle until you start deploying resources.
https://metallb.universe.tf/configuration/
apiVersion: metallb.io/v1beta1
kind: IPAddressPool
metadata:
  name: first-pool
  namespace: metallb-system
spec:
  addresses:
  - 192.168.1.240-192.168.1.250
3. external name
외부와의 서비스를 연결하기 위해서 사용합니다.
아래 yaml 설정에 metedata의 name의 이용하여 pod 내부의 container들이 www.google.com 과 통신을 할 수 있습니다.
1) external name yaml
apiVersion: v1
kind: Service
metadata:
  name: ex-name
  namespace: default
spec:
  type: ExternalName
  externalName: www.google.com
2) 확인
jupyterhub/k8s-network-tools:1.2.0 이미지를 이용하여 ex-name 으로 ping이 가는지 확인 합니다.
apiVersion: v1
kind: Pod
metadata:
  name: netutils
  labels:
    app: netutils
spec:
  containers:
  - image: jupyterhub/k8s-network-tools:1.2.0
    command:
      - "sleep"
      - "604800"
    imagePullPolicy: IfNotPresent
    name: netutils
  restartPolicy: Always
4. ClusterIP 와 Headless
1) ClusterIP
ClusterIP의 뜻은 클러스터 내의 모든 Pod가 해당 Cluster IP 주소로 접근을 할 수 있다는 뜻입니다.
(1)용도
Cluster 내부에서 사용되 Load balancer입니다.
(2) 장점
Cluster내부에만 존재하는 pod들 대상으로 load balancing 해줍니다.
(3) 단점
Cluster내부에서 밖에 사용을 못 합니다.
2) Headless
용도는 Cluster 내부에서 IP를 사용하지 않고 domain을 이용해서 통신 할 때 사용 합니다.
(1) yaml
apiVersion: apps/v1
kind: StatefulSet
metadata:
  name: sts-chk-hn
spec:
  replicas: 3
  serviceName: sts-svc-domain #statefulset need it
  selector:
    matchLabels:
      app: sts
  template:
    metadata:
      labels:
        app: sts
    spec:
      containers:
      - name: chk-hn
        image: sysnet4admin/chk-hn
---
apiVersion: v1
kind: Service
metadata:
  name: sts-svc-domain #ServiceName과 일치 해야 한다.
spec:
  selector:
    app: sts
  ports:
    - port: 80
  clusterIP: None
(1) 확인
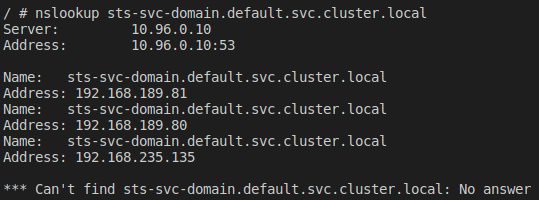
externalname에서 사용한 확인용 pod에서 nslookup으로 svc를 검색 그러면
Address가 뜨고 그다음에 아래 에러가 뜨는게 무시 하면됩니다. nslookup 의 domain 규칙을 잘못 입력해서 발생하는 것으로 보임.
server can't find sts-svc-domain.svc.cluster.local: NXDOMAIN
https://github.com/kubernetes/kubernetes/issues/57671 에서 참조함
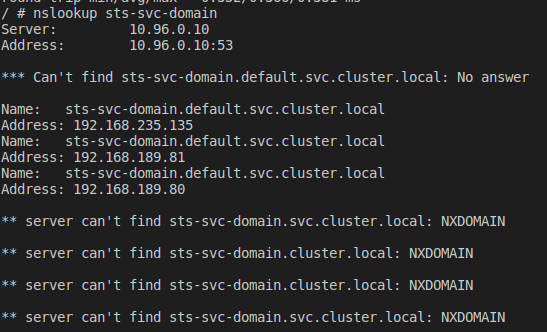
nslookup 검색시 <pod>-<N>.<statefulSetName>.<namespace>.svc.cluster.local 이 형식으로 FQDN으료 요청 해야합니다.
5. endpoint
service가 도달 할 수 있는 pod를 endpoint라고 합니다.
1) 활용 방법
endpoint를 아래 와 같이 proxy 처럼 사용 할수 있습니다.
service -> endpoint -> loadbalancer
아래 yaml 파일은 cluster 내부에서 external-data 로 wget을 요청 할 시 enpoint를 통해서 loadbalancer를 호출하는 방법 입니다.
(1) yaml
# service 정의
apiVersion: v1
kind: Service
metadata:
  name: external-data #name을 가지고 endpoint 와 연결 합니다.
spec:
  ports:
    - name: http
      port: 80
      targetPort: 80
---
#service와 연결할 endpoint 정의
apiVersion: v1
kind: Endpoints
metadata:
  name: external-data #name을 가지고 service 와 연결 합니다.
subsets:
  - addresses:
      - ip: 192.168.0.26 #연결할 IP 주소
    ports:
      - name: http
        port: 80
---
#endpoint와 연결할 loadbalancer 정의
apiVersion: v1
kind: Service
metadata:
  name: lb-endpoint
spec:
  selector:
    app: nginx
  ports:
    - name: http
      port: 80
      targetPort: 80
  type: LoadBalancer
2) 테스트
upyterhub/k8s-network-tools:1.2.0 이미지를 이용하여 pod를 만든후 wget으로 external-data 요청시 정상적으로 index.html이 받아지는 것을 확인

6. ingress
'Cloud > k8s' 카테고리의 다른 글
| [k8s-deep dive] OCI 란? (0) | 2023.11.21 |
|---|---|
| [k8s] container runtime별 관리 tools (0) | 2023.03.06 |
| [k8s] k8s 관련 지식 (0) | 2022.11.26 |
| [k8s] 2. 네트워크의 종류 및 CNI (0) | 2022.11.22 |
| [k8s] 1. 네트워크 구현 방식 (0) | 2022.11.19 |